How to Get Great DIY Photos of your Handmade Line - On the Cheap
I remember the first time I had to take product photography. We had to get through hundreds of photos in one day, and I’m thinking, how hard could this be? We had a professional wedding photographer (she can figure it out, right?) and some good natural lighting in our building, but no real idea of where the sun hit the windows or how to set up the products.
If you’ve worked on your own product photography, you’re laughing at me right now.
Getting great photos of your handmade line is not “point and shoot”. It’s a science. Thankfully, with the right equipment, you can DIY high quality photos and importantly, that equipment won’t break the bank.
Why do I need great photos?
Sales are all about perceived value. What stockists and customers perceive the value of your products to be is their baseline for what they’ll pay for them. Beautiful web design and product photography “up” the baseline: with great photos, you showcase the professionalism of your lines and the desirability/fit of your products in their store. Especially for makers starting out, stockists may not recognize your brand name (brand recognition automatically ups perceived value) and product photography becomes even more important: you’re branding your product line and selling the products at the same time.
Beyond just appeal, great photos give makers confidence to go out there and grow their wholesale boldly. At Wholesale In a Box, we’ve worked with hundreds of makers. What is one predictive measure of success for our makers? Whether they’re confident with the quality of their product photography or not.
Let’s do this.
Two caveats:
Photography is a science and an art and can take decades to master. We’re certainly not photography experts, but are passing along some basics that can help makers who want to “DIY” some great photos of their handmade line. Everyone has different ways of doing things, but these are some starting points.
You can find product photographers with experience (and equipment) and possibly save yourself a lot of time and money. This article is specifically for people who really want to do the photos themselves.
What you need:
A Camera
This is your biggest investment. Dale Tan, a commercial product photographer, wrote this great post on Quora, which gives a few different suggested cameras at all different price points.
Here are some recommended settings:
Focal Length 70mm (especially for large object photography)
ISO100 or as low as possible
Aperture F10 or greater
Shutter speed 1/125
White Balance flash (this helps ensure the correct color)
While we recommend a nicer camera (especially if you’re planning to photograph your own products over the long haul) it IS possible to take photos with a smartphone. Check out what Pixelz says here.
Tripod
To get great photography, you need stability. You can find cheap used tripods on Amazon. Be sure to find something that can match the variable heights of your photography - the table or props you may be taking photos on.
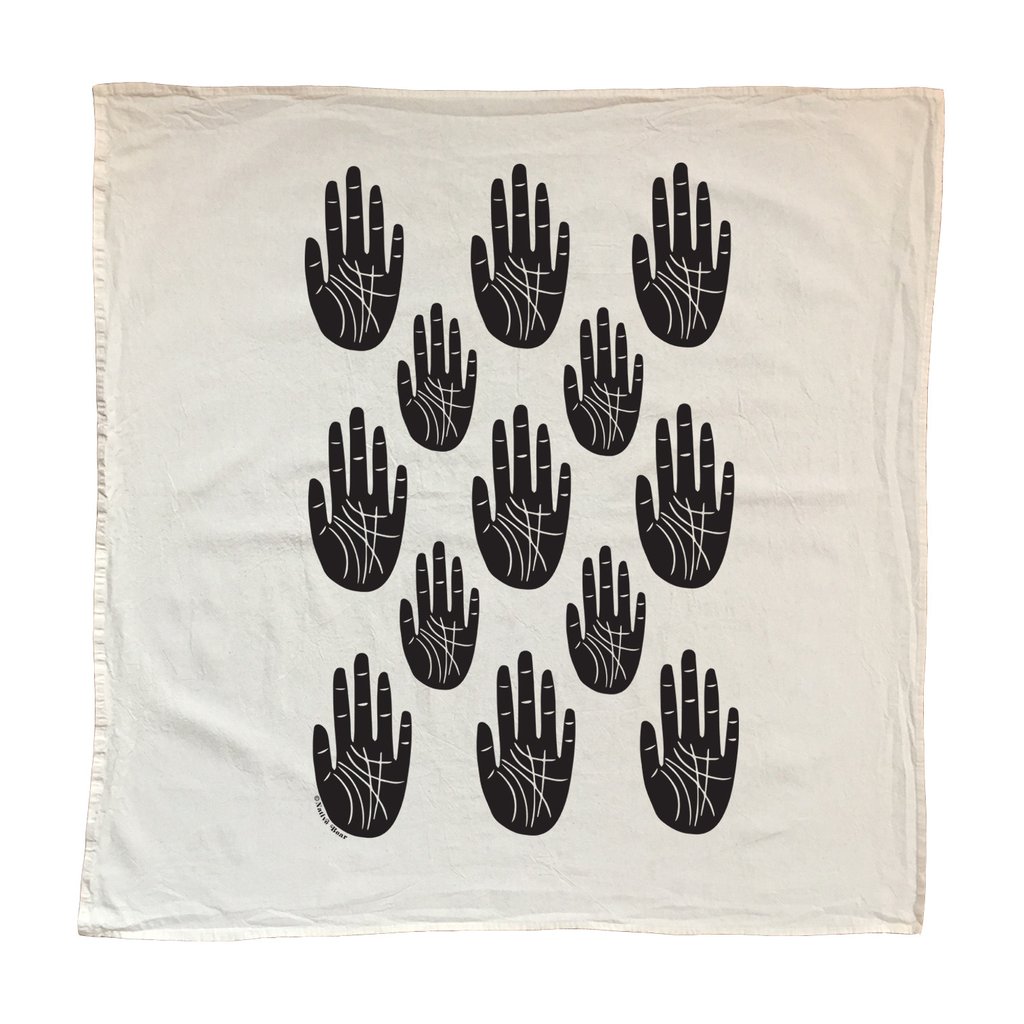
White Background
A neutral solid color background (white or light gray) conveys professionalism in your photos and is used by most makers. These photos are different from your staged photos (see #5 below) and both are important!
Cheap solution: buy a roll of white craft paper, tack it to a solid surface (poster board) with metal clips, and roll it out over a table top. Place your product right where the poster hits the table.
You can also (if you have large products) use a neutral colored wall as the backdrop, or buy a large roll of white paper and tape it to the top of a wall in your home or studio. Be sure to roll it out on the floor past your product photography.
Make sure you place your photos at the same place on the background. You’ll want the amount of white space around your products to match across your line - and you should use whitespace to help a stockist or customer to determine sizing differences. For instance, if you have one textile that is smaller than another, the whitespace should be greater on the smaller one.
Lighting
For small to medium product photography: A light cube / tent kit is your best bet for easily recreating the same light across multiple days. You can find them on Amazon for less than $20. If you’re going for a white, sterile background (great for creating consistency in your product photography) you can get two small lamps and point them directly on either side of your cube. If a light cube is out of your budget, you can also use white foam poster board to bounce light off of your product. You can fold it in a L shape around your product.
Create Indirect Light for large photo photography:
You can use a lamp (or get fancy and buy professional studio lighting) for indirect lighting.
If you’re in your own space, place a soft overhead light directly above your product. You can also use a high powered light, placed directly behind your product and pointed at the ceiling. This will reflect light down onto your product.
If you’d like more shadows on the product, you’ll place a lamp off to the side (about 45 degree angle) so that the light is angled towards the product.
If you don’t have a lamp, you can take photos next to a window, but take your photos during a time when the light through the window is indirect (less harsh).
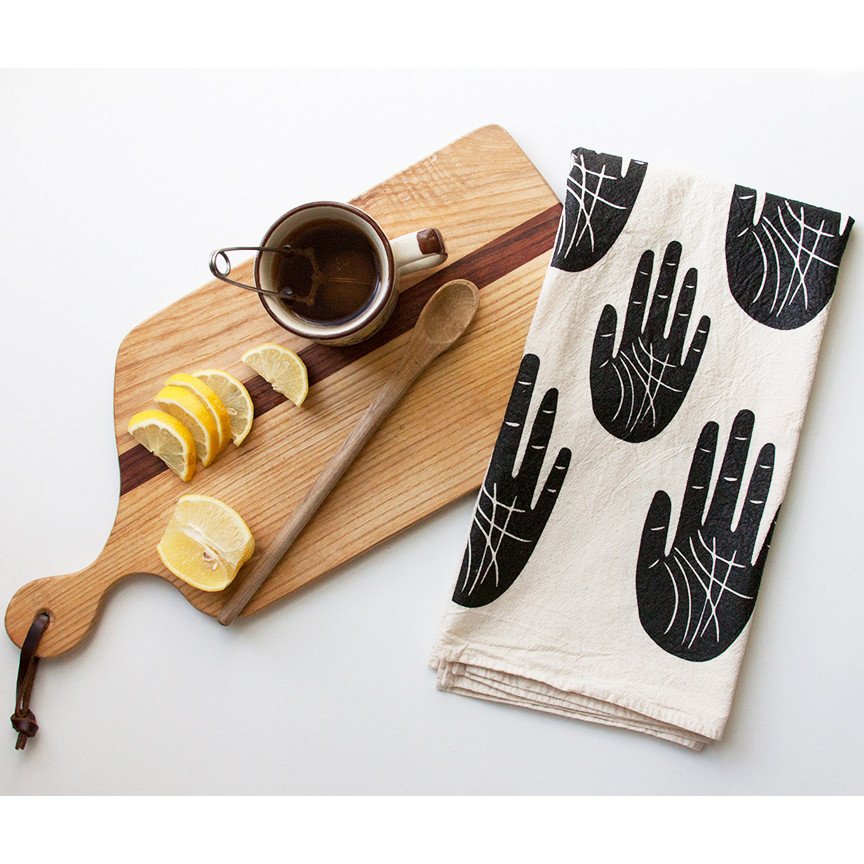
Creative Staging
Standard photos on white backgrounds are great, but you also want to show stockists and customers the “feel” of your product. How do you imagine it fitting within a space? What is its function? Staging is where product photography gets fun.
For instance, if your product fits on a table, add in the plate, the napkin, the cutlery. Put it on a table!
If your product is a home good, take some photos of the product in the home - if it’s decor, put it in a room that you feel was made for this piece. Don’t feel comfortable showcasing your own home? Ask a friend or someone in your network if you could take some photos in their house or office.
Be sure your staging matches the light and camera quality of your standard product photography!
Below are two photos from Wholesale In a Box Maker, Native Bear. The photo on the left is a white background product photo. The photo on the right is a staged photo.
All told, photographing your handmade line will be an investment.
It’s an investment of resources (depending on the camera you buy, you should budget about $300 for all of the above supplies at their cheapest versions). It’s also an investment of time: you’ll need to photograph your line and then do it again and again as you launch new products. Staying on top of it can be difficult, but it’s also rewarding.
Increasing the perceived value (and professionalism) of your products not only allows you to charge what they’re worth, but it also creates trust between you and stockists.
So make a good playlist, carve out a day to focus, and have fun.
This article is brought to you by Wholesale In a Box, a system that helps you introduce your work to stores & cultivate reorders.
You make it happen. We make it easier.
MORE TRAINING ON RELATED TOPICS...